
Setting Up the QA Agent
The QA Agent reviews closed tickets against a set of built-in checks — plus any custom instructions you give it — and surfaces what needs attention on the Service Quality dashboard. It doesn’t replace a manager’s review; it makes sure every ticket gets one, consistently, without anyone having to read them all.
INFO
Requires a connected PSA (ConnectWise Manage, Autotask, or HaloPSA) — the QA Agent reviews real tickets pulled from it. It’s a company-wide setting, not something you turn on board by board.
Turning it on
1- Enable the agent. In Mizo Console › Automation, turn on QA Agent. This is an admin-only setting.
2- Find the settings tab. Once enabled, a QA tab appears under Workflow settings — this is where you configure capabilities, schedule, and custom instructions.

What it checks
The QA Agent ships with five checks you can toggle on or off. Each one looks at a different slice of the ticket:
| Capability | What it looks at |
|---|---|
| Documentation Gap Detection | Whether real work was done but left no useful trace in your knowledge base |
| Minimum Resolution Detail | Whether the closing notes are too thin for the work performed |
| Professionalism & Tone | Whether outbound, technician-written replies read professionally |
| Time Entries Validation | Whether logged time, work type, and billing align with the work described |
| Customer Satisfaction | Whether a ticket’s messages show signs of a frustrated or at-risk customer |
Two additional actions — automatically changing a ticket’s status and automatically posting a summary note to your PSA — are visible in settings but marked coming soon; they aren’t live yet.
Whatever a check finds, it always rolls up into the Service Quality dashboard — there’s no separate report to remember to check.
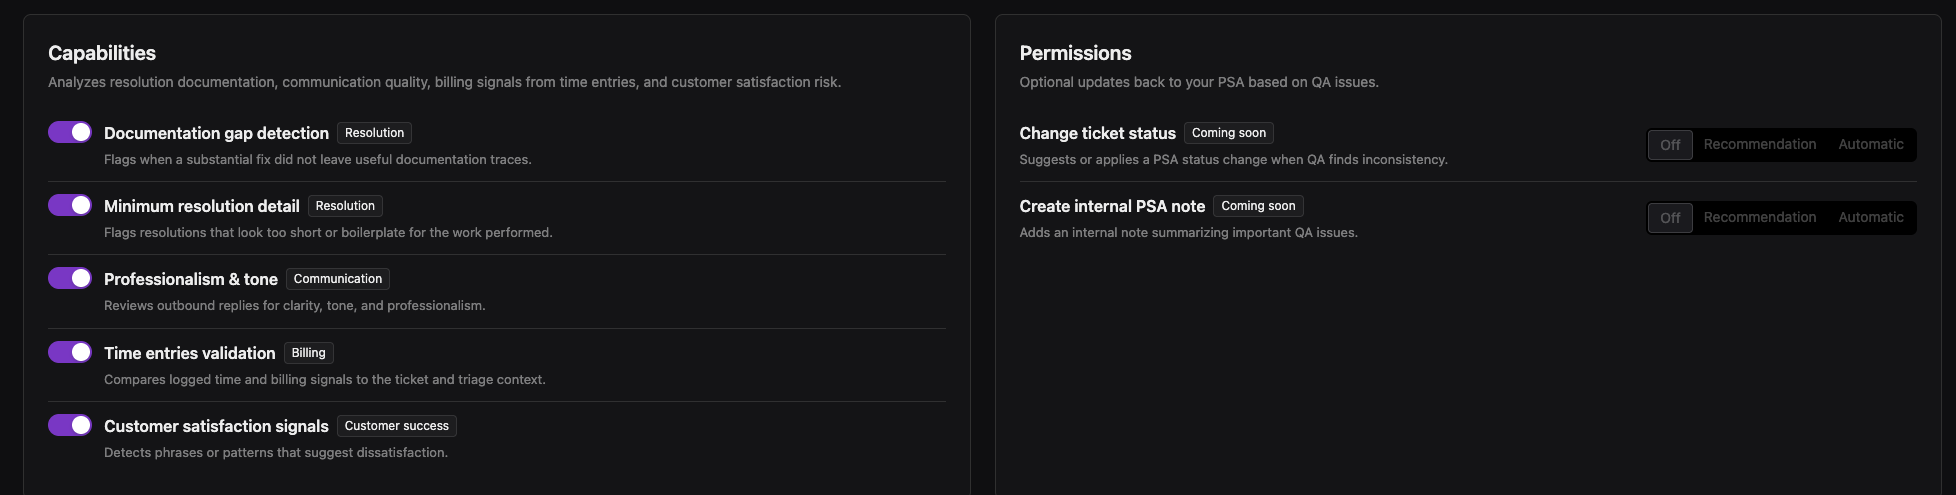
Each capability has its own on/off toggle — turn off any check that doesn’t apply to how your team works. The Permissions actions on the right will get their own Off / Recommendation / Automatic modes once they’re out of preview.
Choosing when it runs
- Realtime — reviews each ticket as soon as it’s closed. Best for continuous coverage.
- Daily / Weekly / Biweekly — reviews everything closed since the last run, in a single batch. Useful if you’d rather review findings in one sitting than as they trickle in.
- Digest email (optional) — sends a recurring summary of QA findings to owners and managers, on the same cadence as the schedule above.

You can also exclude specific boards, queues, or ticket types from automatic runs — for example, alert-only or vendor-generated tickets that don’t need the same scrutiny as end-user work. Excluded tickets can still be reviewed manually at any time.
Writing custom instructions

This is the part worth spending real time on. Custom instructions is a single free-text box — up to 5,000 characters — where you describe what matters to your team. It’s not split into separate rules or checks; the agent reads it once, in full, before it starts reviewing tickets. Think of it as briefing a new QA reviewer on your team’s specific standards, in plain language.
Because it’s one continuous block of text with no built-in structure, how you write it matters as much as what you write. A few principles that make a real difference:
State the default, then the exception. If you only tell the agent what to flag, it may flag things that are actually fine; if you only tell it what’s fine, it may miss real issues. Give it both.
Treat Remote Business Hours (Standard) as included work by default. Do NOT flag included agreement work as an issue unless the work type or activity contradicts expected usage.
Pair every “flag when” with a “don’t flag when.” This is what keeps the agent from generating noise on legitimate edge cases.
Flag as issues: technical work logged as communication to avoid billing. Do NOT flag: legitimate communication entries (emails, calls, coordination) marked as non-billable where appropriate.
Group related instructions under your own headers. The field has no built-in sections, so if you’re covering more than one topic, structure it yourself — it keeps a long instruction set scannable and makes contradictions easier to spot before you save.
Onsite Work Rules — … Work Type Validation — … Escalation Criteria — …
Call out known recurring exceptions by name. If a category of ticket doesn’t follow your normal standards, say so explicitly rather than hoping the agent infers it.
Some tickets are new customer leads that never receive service — the description usually starts with “lead information.” If there’s no evidence of an appointment or equipment drop-off, no resolution is needed.
Give it a concrete definition of “reasonable.” Vague instructions like “check if the time makes sense” underperform. Spell out what evidence should be present.
Flag entries where notes are too short or vague, or where long time entries lack sufficient detail about troubleshooting performed, issues encountered, outcomes achieved, or remaining work.
Add nuance to the built-in checks rather than trying to disable them. Your instructions run before the agent applies its checks, so phrase them as refinements — “don’t flag X unless Y” — instead of trying to turn a check off outright.
Keep it tight. 5,000 characters is a hard limit. Lead with the exceptions and edge cases you see most often, not an exhaustive policy manual — a shorter, sharper set of instructions outperforms a long one that buries the important parts.
Revisit it. After a few weeks, check which findings on the Service Quality dashboard were useful and which weren’t, and tighten your instructions where the agent is over-flagging or missing things.
💡 If your instructions can’t beat the in-product placeholder text in specificity — “Prioritize tickets tagged Critical. Flag any ticket where time entries are missing a work type. Treat resolution as incomplete until the customer confirms.” — they’re probably too vague to change the agent’s behavior.
More examples to adapt
Each row below targets a different capability. Use them as templates — swap in your own agreement names, tags, and client names.
| Goal | Example instruction | How to achieve it |
|---|---|---|
| Make onsite work billable by default | Onsite work should be treated as billable by default. If it’s logged as non-billable or included, flag it as a potential billing issue unless there’s clear evidence of a pre-approved onsite allowance or project inclusion. | Reuse the same “X by default, flag unless Y” sentence shape from the billing example above for every new work category you cover — consistency in phrasing makes a long instruction set easier to write and to audit later. |
| Prioritize high-priority tickets first | Prioritize tickets tagged Critical or High — review these first and apply the strictest resolution-detail standard to them. | Tie priority to something observable in the ticket (a tag or field), not a subjective read like “urgent-sounding” — the agent can only act on what’s actually in the data. |
| Narrow what counts as a documentation gap | Only flag a documentation gap when the ticket involved a a config change, hardware replacement, or permission change. | The built-in check uses its own judgment of “non-trivial.” Giving it your own list of qualifying activities stops it from flagging routine work your team never documents anyway. |
| Enforce a specific resolution note format | Every resolution note must contain three labeled sections, in this order: Issue Summary, Actions Taken, and Resolution. Flag any closed ticket whose note is missing one of these sections, has a section left blank, or presents them out of order. | Spell out the exact section labels and order you require, verbatim, instead of asking the agent to judge “is this detailed enough” in the abstract. A named-section check is something the agent can apply consistently across every technician, and it catches format drift even when the note itself reads as reasonably detailed. |
| Relax tone standards for specific clients | For clients tagged VIP-Casual, an informal, conversational tone in technician replies is expected and should not be flagged for professionalism — only flag actual rudeness or factual errors. | Ground the exception in a field you control (a client tag), not a vague notion like “our friendlier clients,” so the agent has something concrete to match against. |
| Catch dissatisfaction earlier | Treat any customer message containing phrases like “unacceptable,” “cancel,” or “speak to a manager” as high-severity dissatisfaction, even if the rest of the ticket looks resolved. | For signals that are more “know it when you see it” than structured data — like sentiment — give the agent explicit trigger language instead of asking it to gauge tone on its own. |
| Override a general rule for one client | For Acme Corp only, all onsite work is included under their Premium agreement — do not apply the standard onsite billable-by-default rule to this client. | Name the client explicitly and state which general rule it overrides. A broad rule written for most of your clients will otherwise misfire on the exceptions unless you call them out by name. |
Reviewing results
Findings show up on the Service Quality dashboard, grouped by ticket, with a severity (info, low, medium, or high) and, where relevant, the evidence and a recommendation behind each one. For every finding, you can mark it Resolved, Dismissed (false positive), or Dismissed (not applicable) — which is also the best signal for what to adjust in your custom instructions next.
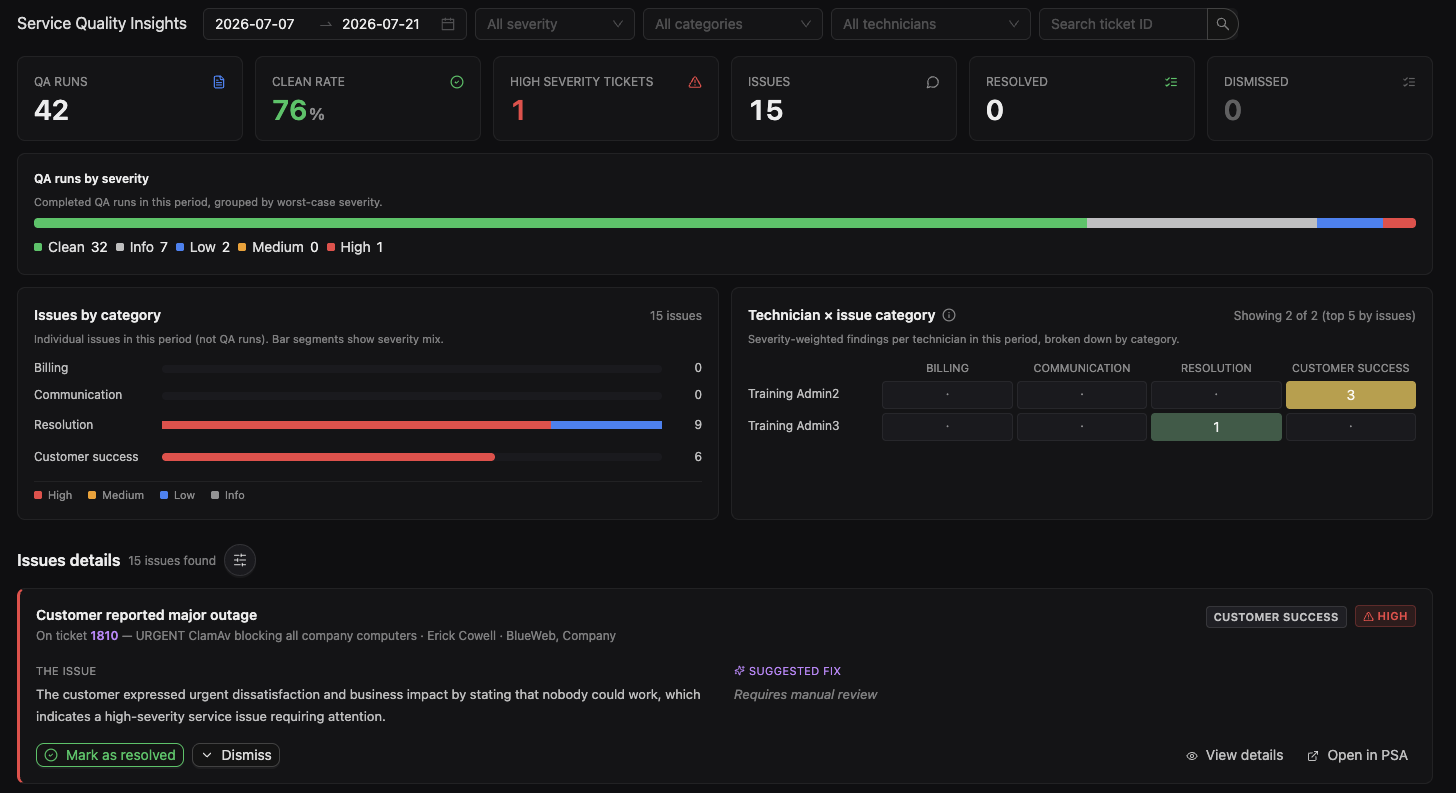
The top row summarizes the selected period (QA runs, clean rate, high-severity count), the charts below break issues down by severity and by category/technician, and Issues details lists each finding with its category, severity, and a one-line explanation of why it was flagged.