
ConnectWise PSA Setup Guide
Purpose
This document outlines the standardized steps for setting up an API integration between ConnectWise PSA (Formerly known as ConnecWise Manage) and Mizo, including API key creation and Pod configuration.
Section 1 – Setting up the base configurations in Mizo
Step 1: Configure Integration in Mizo
- Log into the Mizo console.
- In the left-hand menu, go to Integrations.
- Select ConnectWise PSA from the list.
Step 2: Enter ConnectWise configurations
- Instance URL:
- Your ConnectWise instance URL (e.g.,
https://{{your-company-name}}.connectwise.com).
- Your ConnectWise instance URL (e.g.,
- Company ID:
- Your ConnectWise Company ID used during authentication.
- Public Key:
- Will be covered in section 2.
- Private Key:
- Will be covered in section 2.
- Instance URL:
Section 2 – Creating an API Key in ConnectWise PSA
Step 1: Log in to ConnectWise PSA
- Sign in to your ConnectWise PSA instance using an Administrator account.
Step 2: Create a Security Role for the Integration
- Navigate to System > Security Roles.
- Click + to add a new role.
- Configure the role:
- Role ID:
Mizo Agent Role - Click Save.
- Role ID:
- Apply the following permissions:
Permissions Matrix
| Module | Feature | Permissions | Notes / Restrictions |
|---|---|---|---|
| Company | Company Maintenance | Edit, Inquire → All | - |
| Configurations | Inquire → All | - | |
| Contacts | Add, Edit, Inquire → All | - | |
| Manage Attachments | Edit, Inquire → All | - | |
| Notes | Add, Edit, Inquire → All | - | |
| Team Members | Inquire → All | - | |
| Project | Project Contacts | Inquire → All | - |
| Project Tickets | Add, Edit, Inquire → All | - | |
| Finance | Agreements | Inquire → All | In the customize popup, make sure all options are in the Allow Access column. Here an example 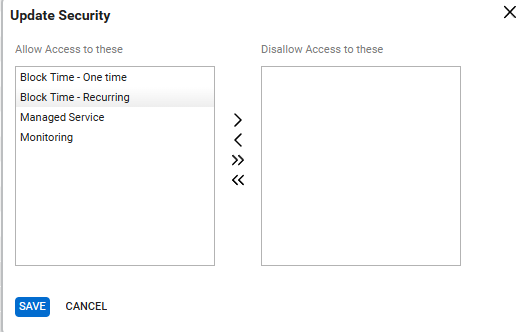 |
| Service Desk | Change Approvals | Add, Edit, Inquire → All | - |
| Close Service Tickets | Add, Edit, Inquire → All | - | |
| Merge Tickets | Add, Edit, Inquire → All | - | |
| Resource Scheduling | Add, Edit, Inquire → All | - | |
| Service Ticket - Dependencies | Add, Edit, Inquire → All | - | |
| Service Tickets | Add, Edit, Inquire → All | - | |
| SLA Dashboard | Inquire → All | - | |
| System | Member Maintenance | Edit, Inquire → Al | - |
| My Company | Inquire → All | - | |
| Security Roles | Inquire → All | - | |
| Table setup | Inquire → All | By default, make sure the following are in the Allow Access to these list: Service / [...], Time / [...], Scheduling / [...], General / Calendar, Company / Company Status , Company / Configuration Status, Contacts / Contact Type, System / Email Connector. | |
| Time & Expenses | Time Entry | Add, Edit, Inquire → All | - |
| Time Entry Billable Option | Add, Edit, Inquire → All | - |
Step 3: Create an API Member
- Go to System > Members.
- Open the API Members tab.
- Click + to create a new API member.
- Fill in the following details:
Member ID:
mizo_ai_agentMember Name:
Mizo AI AgentRole ID:
Mizo Agent RoleLevel: Typically
CorporateCAUTION
Access to boards can be managed in Mizo. You don’t have to restrict access to board in ConnectWise PSA.
If you choose to do so, theRestrict Board Accesssetting acts as a blacklist. So make sure that the boards you want to enable are not in that list
- Click Save.
Step 4: Generate the API Keys
- Once the API Member is saved, go to the API Keys tab.
- Click + to generate a new API key.
- Configure:
- Key Name: e.g.,
MizoIntegrationKey
- Key Name: e.g.,
- After saving, note the generated keys:
- Public Key, add it to the mizo console.
- Private Key ⚠️ Important: The Private Key is displayed only once — copy it immediately and add it to the Mizo console.
Step 5: Save configuration in Mizo
- Save the configuration in the Mizo console.
- Ensure that the connection test is successful. If not, validate the login information or API keys.
- Copy the Pod URL for the next section.
CAUTION
If you are using Nilear, please set up Nilear in the console by following the guide here.
Section 3 – Creating the Mizo Pod in ConnectWise PSA
Step 1: Log in to ConnectWise PSA
- Use an Administrator account to sign in.
Step 2: Navigate to Hosted API Settings
- Go to System > Setup Tables.
- Search and select Manage Hosted API.
Step 3: Add a New Hosted API (Pod)
- Click + to add a new entry.
- Fill in the following fields:
- Description:
Mizo Agent Pod - Screen:
Service Ticket - Origin:
https://app.mizo.tech - URL: The pod URL from section 2 (e.g.,
https://app.mizo.tech/hostedapis/connectwiseiframe/{{your-company-id}}?clientId={{your-mizo-id}}&ticketId=[cw_id]). - Pod Height: Recommended value:
900
- Description:
- Click Save.
Section 4 – Test setup
Step 1: Navigate to one ticket
- Open a ticket in your ConnectWise PSA service desk
- The Mizo pod should appear.
- While Mizo is catching up on your ticket, you might receive an error that this ticket is not processed by Mizo. This is normal.
Troubleshooting
API member not found
- Please validate that the member id
mizo_ai_agentis set for the Mizo Api Member. The name has to be an exact match.
Forbidden error
- Please validate that the permission
Security Roles --> Inquire --> Allis present on the Mizo ApiMember