
IT Glue Setup Guide
Purpose
This document outlines the standardized procedure for integrating ITGlue with the Mizo platform. It covers both user creation for document access and API key setup to ensure secure and scoped access.
Section 1 – Setting up the base configurations in Mizo
Step 1: Configure Integration in Mizo
- Log into the Mizo console.
- In the left-hand menu, go to Integrations.
- Select ITGlue from the list.
Step 2: Enter ITGlue URL
- Instance URL:
- Enter your ITGlue instance URL (e.g.,
https://{{your-company-name}}.itglue.com)
- Enter your ITGlue instance URL (e.g.,
- API Key:
- Will be covered in section 2.
- Webapp Username / Password:
- Will be covered in section 3.
Section 2 – Creating an ITGlue API Client for Mizo Integration
Step 1: Log in to ITGlue
- Use an Administrator account to sign in.
Step 2: Navigate to Admin Settings
- In the top navigation bar, click Admin.
Step 3: Generate an API Key
- Scroll to the API Keys section.
- Click + New API Key.
- Uncheck the option for Password access.
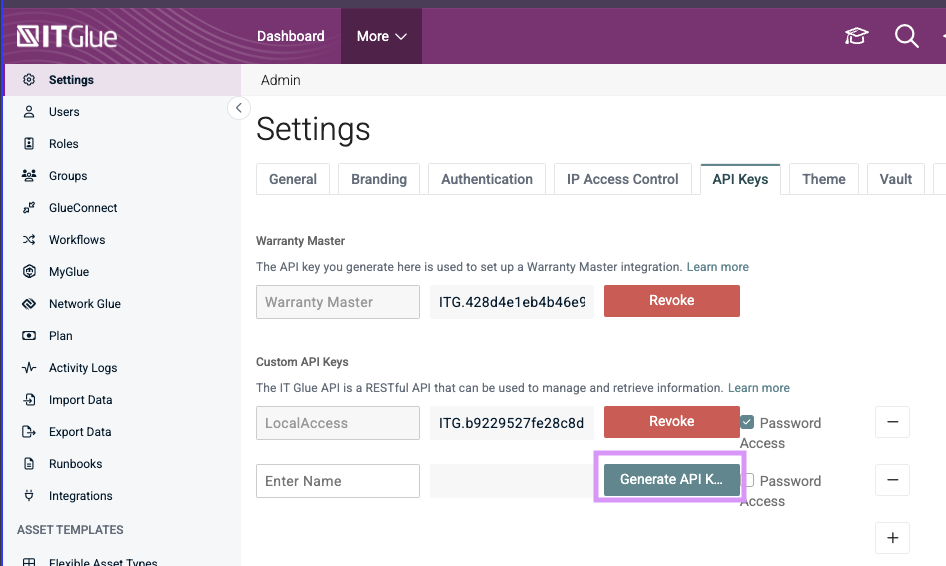
- Once the key is generated:
- Copy the API key immediately (it will only be shown once).
- Add the API Key to the Mizo console.
CAUTION
The API key will only be shown once — copy it immediately and save it in the Mizo console.
Step 4: Save configuration in Mizo
- Save the configuration in the Mizo console by leaving the Webapp Username / Password fields blank. These steps will be completed after section 3 by a Mizo admin.
Section 3 – Creating a Mizo User in ITGlue
Step 1: Log in to ITGlue
- Use an Administrator account to sign in to the ITGlue web platform.
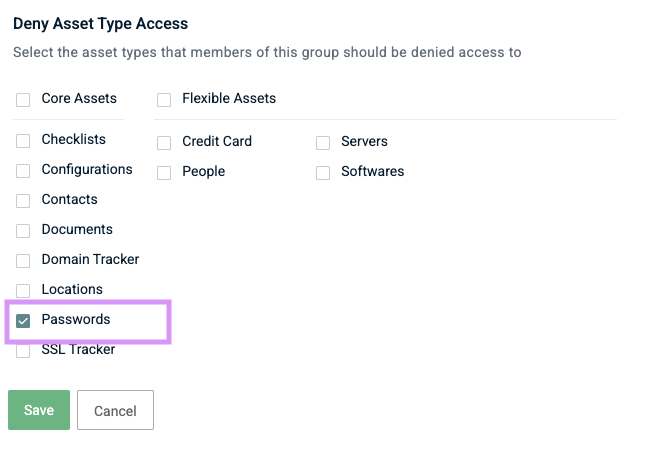
Step 2: Add a new Group (Restrict Password Access)
- Go to the Groups tab and click + New (top-right corner).
- Configure the group as follows:
- Group Name:
Mizo Agent Passwords Deny - Deny Asset Type Access:
Passwords
- Group Name:
Step 3: Add a New User
- In the left-hand sidebar, navigate to Users.
- Click + New (top-right corner).
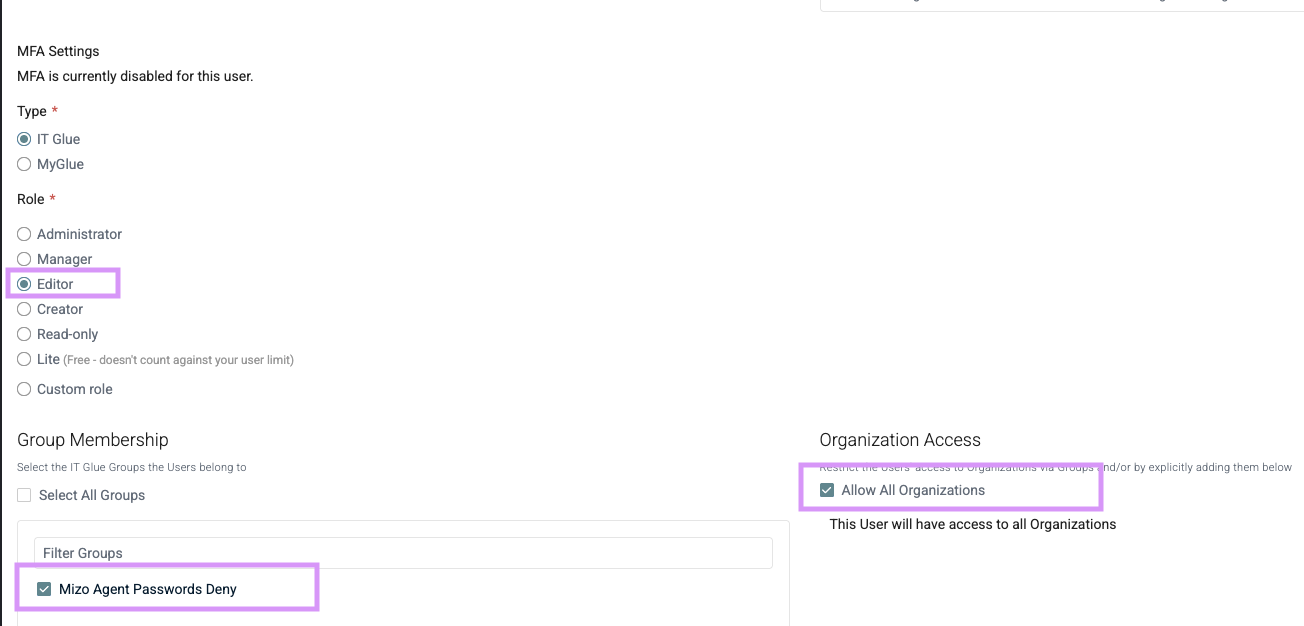
- Fill in the following user details:
- Name:
Mizo Agent - Email Address:
itglue.account+{CompanyName}@mizo.tech(e.g.[email protected]) - Role:
Editor
- Name:
- Assign the Mizo Agent user to the created group to restrict visibility of sensitive credentials.
- Configure Access to Organizations
- Scroll to the Organizations section (bottom-right).
- Specify which organizations the user should have access to:
- Select relevant organizations individually
or - Select All Organizations if company-wide access is appropriate.
- Select relevant organizations individually
Step 4: Ensure Password Auth is Enabled
CAUTION
Mizo uses password authentication in order to access IT Glue resources. If your IT Glue tenant enforces SSO, an exception should be added for the Mizo Agent.
- In the left-hand sidebar, navigate to Settings.
- Click Authentication (Top bar).
- If any of the Single Sign-On options are activated, scroll down to the section
Require Log In with {SSO Option}If it is enabled, make sure the Mizo Agent is in the User Exceptions list
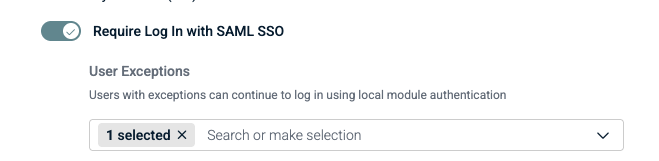
If it is disabled, no action is required
Step 5: Send the Invitation
- Click Save or Send Invite to finalize the user creation.
- A Mizo admin will receive the invitation and complete the account setup.